Congratulations! You are now running Minibian on your Raspberry Pi! But what do you do now? Regardless of your goal for the Raspberry Pi, there are a few things you should do before proceeding after you first install Minibian. (Or any other operating system for that matter).
Step 1: Change your password!
Minibian comes with a root account named “root“, with the password “raspberry“. Like you would on any system, it is fairly imperative that you, at the very least select your own password. It is possible to set up your own user account which can be elevated to root privileges only when needed, and at the same time just getting rid of the password for the root account all together. But to keep things simple, let us just start by setting a custom password for the existing root account. To change the password, log into the system and simple type “passwd” into the command-line interface. You will be asked to enter your new password and a second time afterwards to confirm it. The reason why this step is so important, is that the root account has the ability to access and modify the entire system. If someone else gains access to your device’s root account, they might damage the software or even the hardware.
Step 2: Expand your system partition!
When you flashed your Minibian (or Raspbian) image to your SD card, the program flashed an image with fixed size partitions. This means that the space available to the system on your SD card, could be a lot less than the actual amount of space the card offers. When you install additional software onto your Raspberry Pi, you might run into problems, because you don’t have enough space to install everything. To possibly prevent this from happening, you should immediately grow your system partition to the maximum available free space on your SD card! The easiest way to do this, is by using the raspi-config utility.
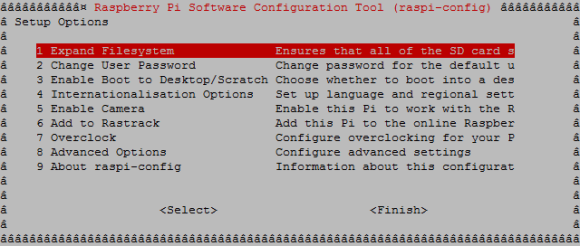
First you will have to make sure that you have the utility installed, by executing “apt-get install raspi-config“. Next, start the utility by executing “raspi-config“. In the program, select option 1 “Expand Filsystem”. Next the command-line interface will show up again and return to the program when the action is completed. Now press “<OK>”, “<Finish>” and finally “<Yes>” to reboot.


Step 3: Update your software!
There are many reasons why you should try to always run the latest software on your devices. The Raspberry Pi is no exception. Before proceeding, it is best you update the software, because newer software than that which came with your operating system image might already be available. Run the command “apt-get update” and next “apt-get upgrade“.
Step 4: Set a static IP?
When you connected up your Raspberry Pi to your home network, you likely used DHCP to configure the connection. This is enabled by default and happens automatically. What DHCP does, is assign a random free address on your network to the device. This is very convenient to get started, but to avoid the address from changing later on, you should assign it a static address which won’t change. That way you always know at what address you can find the device. If you are familiar with networking and IP addresses, you can go ahead and choose a random address you know is available to do this. If you are not, it might be convenient to use the address which the DHCP server already assigned to the device. The DHCP server will check if the address is already in use when assigning IPs to other devices, so you can be sure that it won’t cause any problems.
To get your current IP settings, enter the command “ifconfig”. This will output your network settings. For a normal Model B with a wired ethernet connection, your network interface should be called “eth0“, its block in the output will have some IP addresses on the second line, make sure you note down all three of them. These are the IP address, the broadcast address and the network mask.
When you have selected an IP address, you will need to set up your static IP. You have to edit the settings file for your network interfaces by using the command “nano /etc/network/interfaces“. Now that you have the file open in the nano text editor. You should see a line that says “iface eth0 inet dhcp“, where “eth0” is the name of your network interface. You have to replace “dhcp” at the end of that line with “static“. Under the previous line, you will have to add several additional lines:
|
1 2 3 4 5 |
address 192.168.1.100 broadcast 192.168.1.255 netmask 255.255.255.0 network 192.168.1.0 gateway 192.168.1.1 |
Address should have the IP address you noted down, the same for broadcast and netmask. On your standard home network, the network address will be the same as your IP, but with the last number being 0, for gateway the same with the last number being 1. If this is not the case because you set your network up differently, you probably have the skills to determine the correct settings. Now you can close nano, you do this by pressing the key combination Ctrl+X, next you will be asked if you want to save the changes, press the Y-key.
Finally you have to restart your network interfaces. You can do this by running the command “/etc/init.d/networking restart“.
Step 5: A custom hostname?
The hostname of your device is essentially its name. The default hostname of the RaspberryPi is… raspberrypi. Though practical, it doesn’t leave much to the imagination. Changing this is of course option, but I like to give my devices their own names. The easiest way is to open the hostname file in nano, like the interfaces file in the previous step. Enter the command “nano /etc/hostname“. Now replace “raspberrypi” with whatever name you like. It’s best to only use lowercase letters and numbers. Now save the file like in step 3 and restart the device by executing the command “reboot“.
Step 6: A user account (optional)
You are free to continue using the root user account of your RaspberryPi, but usually you would make your own account that is able to elevate its privileges to super user, only when needed. This adds somewhat of an extra security layer to the system. The first thing you should do is install the sudo application, as this is not installed by default on Minibian, and it will allow you to elevate the privileges of an account. Install it by running “apt-get install sudo“. Next you should add a new user, by executing the command “adduser <username>“. You will be prompted to enter some information. Make sure you enter a password and that you remember it of course. You can also enter your name and some other details, but all of these are optional.
Now that your account has been set up, you will want to give it the ability to elevate its privileges. This can be done by editing the sudoers file, but this is generally not good practice. The system has a default usergroup called “sudo“, which should already be configured in the sudoers file. You can add the user to this group with the command “adduser <username> sudo“. In the previous commands, make sure to replace “<username>” with a username of your choosing of course. Next time you log into the system, you can use your new account, rather than the root account you were using previously. When you execute a command which you need super user privileges for, you need to add “sudo” at the start of it. For example: “sudo nano /etc/network/interfaces” to edit the network interfaces configuration. The first time you do this, you will be asked for your account’s password. The password will be remembered for a period of time, so you don’t have to enter the password every time you execute a series of commands as super user.
Now that your own user account is set up, you could disable the root account, by removing its password. This step is not required but does add yet another extra security measure. A notable reason you might want to retain the root password is to be able to retain super user access in the event that your personal account is accidentally deleted or stripped from its privileges. To strip the root user from its privileges, execute the command “passwd -dl root” (add sudo at the front of the command if you are logged in with your own user account of course). If you want to assign a password to the root account later, you can do this simply by executing “sudo passwd root” and entering a new password.
What’s next?
Whatever you can imagine. The Raspberry Pi is a fully functioning computer and an amazing hardware development platform. You can check out some of my other guides which may be useful to you:
- Setting up the NoIP Dynamic DNS service on your Raspberry Pi
- Setting up the PiFace Digital I/O expansion board
Great guide, thanks a lot! Just one additional tip: For me, step 3, “Expand your system partition” needed to be done before step 2, “Update your software” – when I updated first, the partition filled up completely, and so no additional software could be installed…
I have switched the steps. When I first wrote the guide, there was sufficient space to perform the update first, but since then the image has changed.
Thanks for your step-by-step guidance!
Following the order of steps resulted in some issues for me. The system upgrade didn’t complete due to limited disk space and condequently I stuck to install raspi-config to extend the system partion. Switching step 2 and 3 solved the issue.
YEP!
This is exactly what i need to be started.
Great guide, tnx
It’s really important to swap the steps 2 and 3.
First expand your FileSystem.
if not, then the image will be unusable after the update, because the update replaces the bootloader. And that will fail!
1. Change passwd
2, apt-get install raspi-config
3. Run raspi-config and expand fs
4. apt-get update && apt-get upgrade
5. have fun ….
Steve
Great post!
Just another important thing left: the certificates are pre-installed in the image, so they should be renewed aswell.
great contribution